You can view System Tasks and System Logs from the System Settings menu. It allows you to track the actions performed in Avanan and helps with auditing purposes.
It also provides a Service Status page that shows the system's health, reported issues related to your Avanan portal, and their status.
System Tasks
Avanan Portal performs operations that can take a few minutes or even longer periods. To prevent the users from waiting until the operation is complete, Avanan Portal includes a System Tasks screen that shows these long tasks' status.
System Tasks are located under the System Settings menu (System Settings > System Tasks). You can see all the tasks that were executed with their status.
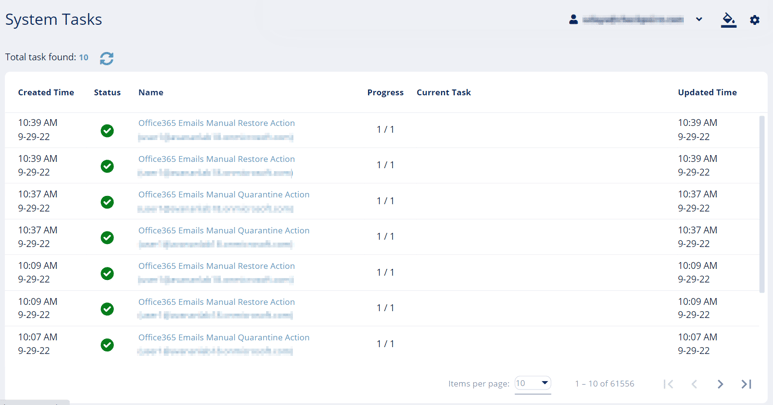
Clicking on one of the tasks shows a dialog that presents the current task status, with all the steps executed. If the task has failed, it shows the error reason.
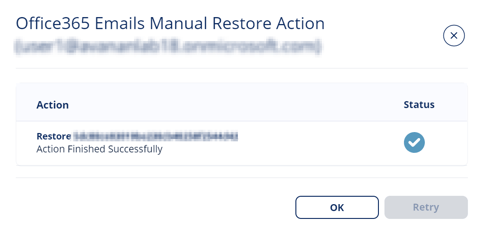
To retry a failed task, click Retry.
System Logs
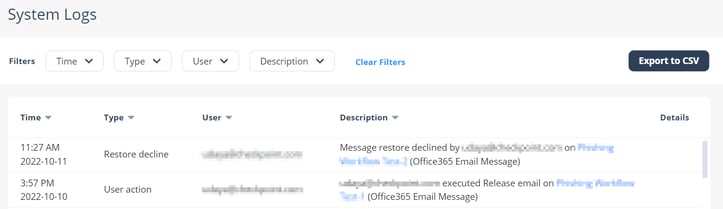
All actions are reported to the System Logs. To see the logs, go to System Settings > System Logs.
To see the required logs, use Filters.
To export logs to an Excel file, click Export to CSV.
Notes:
- The System Logs are retained only for 12 months.
- The time displayed under the Time column reflects your browser's time zone.
Service Status
Avanan notifies the administrators on system health status and maintenance activities relevant only to your tenant in the Avanan Portal.
The Service Status page allows you to:
- View the current health of the system and see if there are any ongoing issues.
- Browse through the history of the issues relevant to your tenant.
- Subscribe to email and/or SMS updates on any issue related to your tenant.
You will see a warning icon in the System Settings menu when there is any ongoing issue. The icon disappears after the issue is resolved.
To view the Service Status page, go to System Settings > Service Status.
Under Service Status, you can view the current health of the system.
- If there are no issues, it shows Operational.
- If there are any ongoing issues, you can view the status, and the configured administrators will receive the status updates.
After the issue is resolved, you can click on the Root Cause Analysis link to view the RCA document.
Under Issues history, using the drop-down, you can choose to view the issues reported in the Past week or All issues.
To select the users to receive notifications on service status updates:
- Go to System Settings > Service Status.
- Click Subscribers.
The Subscribers page opens and shows a list of users configured in the Avanan Portal. - In the Notify Via column, select Email and/or SMS for the user you want to send alerts.
Note - To select SMS, the user should have a phone number. For the procedure to update the user information, see User management. - Click Save.
You can add group mailboxes or users that are not Avanan portal users to receive notifications on service status updates.
To add group mailboxes or users outside the Avanan portal:
- Go to System Settings > Service Status.
- Click Subscribers.
- Click + Add Subscriber.
- In the Add Subscriber page, add the relevant details.
- Enter First name and Last name.
- Enter Email address.
- In the Phone number column, select the country code and enter the phone number.
- In the Notify Via column, select Email and/or SMS for the user you want to send alerts.
- Click Add Subscriber.
To edit or remove group mailboxes or users outside the Avanan portal:
Note - You cannot edit or remove Avanan portal users.
- Go to System Settings > Service Status.
- Click Subscribers.
The Subscribers page opens and shows a list of users. - To edit the details:
- Click the vertical ellipses icon (in the right corner of the row) and select Edit Subscriber.
- Update the relevant details and click Save.
- To remove a user:
- Click the vertical ellipses icon (in the right corner of the row) and select Remove Subscriber.
- In the confirmation pop-up, click Yes.