Avanan supports Security Engine Exceptions that are specific to individual security engines within the system. For example, an Anti-Phishing exception will not affect the Anti-Malware inspection of an email.
Security Engine Exceptions
- Anti-Phishing Exceptions
- Anti-Malware Exceptions
- DLP Exceptions
- Click-Time Protection Exceptions
- URL Reputation Exceptions
Anti-Phishing Exceptions
The Anti-Phishing security engine supports defining Allow-Lists and Block-Lists.
The Anti-Phishing engine stops scanning emails that match an Allow-List or Block-List rule. The Anti-Phishing verdict will automatically be clean (for Allow-List) or Phishing / Suspected Phishing / Spam (for Block-List).
Note - Emails in the Anti-Phishing Allow-List and Block-List are evaluated by other security engines, such as Anti-Malware and DLP.
Viewing Anti-Phishing Exceptions
To view the configured Allow-List or Block-List rules:
- Go to Security Settings > Exceptions > Anti-Phishing.
- In the drop-down from the top of the page, select the required exception type (Allow-List or Block-List).
The page shows a table with all the exceptions and the defined criteria.
In the Anti-Phishing Allow-List table, the Affected emails column shows the number of emails flagged as phishing or spam by the Anti-Phishing engine but marked as clean because of the allow-list rule.
Note - The numbers for each allow-list rule in the Affected emails column do not update in real time. It might take up to an hour for them to update.
Adding Anti-Phishing Allow-List or Block-List Rule
You can add the Allow-List or Block-List rule from any of these:
- From the Anti-Phishing Allow-List / Block-List
- Navigate to Security Settings > Exceptions > Anti-Phishing.
- In the drop-down from the top of the page, select the required exception type (Allow-List or Block-List).
- Under Filters, define the criteria for filtering the emails and click Search.
- After refining the email criteria, click Create Allow-List Rule to create an allow-list rule or Create Block-List Rule to create a block-list rule.
- If required, enter the description for the rule under Comment and click OK.
- From the Mail Explorer (see Creating Allow-List and Block-List Rule)
- From the email profile page
- Open the required email profile.
- Under Security Stack, select Similar Emails / Create Rules.
- Under Filters, define the criteria for filtering the emails and click Search.
- After refining the email criteria, click Create Allow-List Rule to create an allow-list rule or Create Block-List Rule to create a block-list rule.
- If required, enter the description for the rule under Comment and click Ok.
Filters to refine the email criteria for Allow-List or Block-List
While refining the criteria for creating Allow-List or Block-List, you can use these filters.
| Filter Name | Description |
| Date Received | Events in the last year, month, week, day, or hour. Also, using Range, you can choose to select the emails on a specific date and time. |
| Quarantine State | Select the events based on these quarantine states.
|
| Recipients | Emails that contain a specific recipient or a recipient that match a specific term. |
| Subject | Emails that match a specific subject. |
| Sender Name | Emails from a specific sender. |
| Sender Domain | Emails from a specific domain. |
| Sender Email | Emails from a specific email address. |
| Client Sender IP | Emails from a specific client and IP address. |
| Server IP | Emails from a specific server IP address. |
| Links in body | Emails that has links to external resources in the body of the email. |
| Attachments MD5 | Emails that has attachments with specific MD5. |
| Headers |
Emails that contain specified headers. |
Administrators can configure whether allow-lists defined in Avanan will affect email enforcement by Microsoft, and vice versa.
To customize this interaction:
- Click Security Settings > Security Engines.
- Click Configure for Smart-Phish (Anti-Phishing).
- Scroll-down to Allow-List Settings and select the required settings.
For more information, see Overriding sending emails to Junk folder and Applying Microsoft Allow-List to Avanan. - Click Save.
Overriding Microsoft / Google sending emails to Junk folder
When an email is allow-listed by Avanan, administrators can ensure that it is not delivered to the Junk folder by Microsoft / Google. To do that:
- Click Security Settings > Security Engines.
- Click Configure for Smart-Phish (Anti-Phishing).
- Scroll-down to Allow-List Settings and select the Allow-List emails that are allow-listed by Avanan also in Microsoft/Google checkbox.
- Click Save.
Note - This setting applies only when the email is processed by a Threat Detection policy in Protect (Inline) protection mode.
Applying Microsoft Allow-List also to Avanan
Administrators can choose to treat every email that is allow-listed by Microsoft (SCL=-1) as allow-listed by Avanan as well. To do that:
-
Click Security Settings > Security Engines.
-
Click Configure for Smart-Phish (Anti-Phishing).
-
Scroll-down to Allow-List Settings and select the Allow-List emails that are allow-listed in Microsoft (SCL = -1) also in Avanan checkbox.
-
Click Save.
Importing Allow-List or Block-List from External Sources
For various use-cases, predominantly migrating from a legacy solution to Avanan, you might need to import a large number of items to the Allow-List or Block-List.
To import Allow-List or Block-List, contact Avanan Support.
Deleting Anti-Phishing Exceptions
To delete the Anti-Phishing Allow-List or Block-List:
- Go to Security Settings > Exceptions > Anti-Phishing.
- In the drop-down from the top of the page, select the require exception type (Allow-List or Block-List).
- Select the exception(s) you want to delete.
- Click Actions from the top-right corner of the page and select Delete.
- In the confirmation pop-up that appears, click OK.
Anti-Malware Exceptions
Anti-Malware Allow-List
Administrators can exclude files from malware inspection so that the Anti-Malware engine always returns a clean verdict for them.
You can use File MD5 hash or a Macro MD5 hash in an Anti-Malware Allow-List rule. You can use Macro MD5 as an exception and prevent the Anti-Malware engine from detecting the file that contains a macro as malware.
Note - Macro MD5 Allow-List supports these file formats: DOC, DOCM, DOCX, DOTM, DOTX, POT, POTM, POTX, PPA, PPAM, PPS, PPSM, PPSX, PPT, PPTM, PPTX, XLAM, XLSB, XLSM, XLSX, XLTM, and XLTX.
You can add Anti-Malware Allow-List rule from any of these:
- From the Anti-Malware Allow-List
- Navigate to Security Settings > Exceptions > Anti-Malware.
- In the drop-down from the top of the page, select the exception type as Allow-List.
- Click Create Allow-List.
- Enter the required File MD5 hash.
- If required, enter a comment for the Allow-List rule.
Administrators can use the commented text to filter and find the Allow-Lists with a specific text from their comments. - Click OK.
- From the Entity Profile page
- Open the required attachment profile from the Security Events.
- Under Security Stack, select Create Allow-List for Anti-Malware.
- Select the Allow-List Type (File MD5 or Macro MD5).
The File MD5 or the file's detected Macro MD5 will be displayed automatically.
Notes:
Administrators can see the code of each Macro MD5 by selecting a specific Macro MD5.
You can add only one Macro in an Allow-List rule and the files containing the allow-listed macro will not be flagged as malicious. - If required, enter a comment for the Allow-List rule.
Administrators can use the commented text to filter and find the Allow-Lists with a specific text from their comments. - Click OK.
Anti-Malware Block-List
Administrators can create Anti-Malware Block-List to mark any file type as malware. By adding a Block-List rule for a file type, the Anti-Malware engine automatically marks all matching file types as containing malware.
Note - For file types (PDF, EML, HTML) that support link identification, you can choose to block these files based on whether they contain links or not.
You can add Anti-Malware Block-List rule from any of these:
- From the Anti-Malware Block-List
- Navigate to Security Settings > Anti-Malware Block-List.
- In the drop-down from the top of the page, select the exception type as Block-List.
- Click Create Block-List.
- Enter the required File Type.
Note - When you add multiple file types, each file type will be added as a separate exception. - For the file types that support link identification (PDF, EML, and HTML), select one of these.
- Block always (with or without links)
- Block only if contains links
- Block only if does not contain links
- If required, enter a comment for the Block-List rule.
Administrators can use the commented text to filter and find the Block-Lists with a specific text from their comments. - Click OK.
- From the Entity Profile page
- Open the required attachment profile from the Security Events.
- Under Security Stack, click Create Block-List for Anti-Malware.
The detected file type displays automatically. - If required, add the required file types.
Note - When you add multiple file types, each file type will be added as a separate exception. - For the file types that support link identification (PDF, EML, and HTML), select one of these.
- Block always (with or without links)
- Block only if contains links
- Block only if does not contain links
- If required, enter a comment for the Block-List rule.
Administrators can use the commented text to filter and find the Block-Lists with a specific text from their comments. - Click OK.
Password-Protected Attachments Allow-List
When a Password-Protected Attachment allow-list is detected for an email address or domain, the system ignores the Password-Protected Attachments workflow configured in the policy and delivers the attachment to the end-user.
- Password detected: The system scans the attachments for malware and gives the verdict.
- Password not detected: The system gives the verdict as allow-listed (clean) and delivers the attachment to the user.
To create a Password-Protected Attachments Allow-List:
- Click Security Settings > Exceptions > Anti-Malware.
- In the drop-down from the top of the page, select the exception type as Password-Protected Attachments.
- Click Create Allow-List.

- In the Email Address / Domain field, enter the email addresses or domains.
If you enter multiple email addresses or domains, the system creates separate allow-list for each email address / domain. - If required, enter a comment for the Allow-List rule.
- Click OK.
DLP Exceptions
The DLP engine supports defining Allow-Lists by Sender, Recipient, File MD5, and Strings.
The DLP engine stops scanning emails, messages, and files that match an Allow-List rule. The DLP verdict will automatically be clean for the Allow-List.
Notes:
- DLP Allow-List applies to both the incoming and outgoing DLP policy rules. For information about DLP policies, see DLP Policy.
- Emails, messages, and files in the DLP Allow-List are evaluated by other security engines, such as Anti-Malware and Anti-Phishing.
- When you add multiple strings, each string will be added as a separate exception. Allow-listed strings will not be flagged as a DLP violation.
Adding DLP Allow-List
You can add DLP Allow-List rule from any of these:
- From the DLP Allow-List
- Navigate to Security Settings > DLP Allow-List.
- Click Create Allow-List.
- Select the required Allow-List Type.
- Sender
- Recipient
- File MD5
- String
- Enter the required sender/recipient's email address or domain, File MD5 or strings.
- If required, enter a comment for the Allow-List rule and click OK.
You can use the commented text to filter and find the Allow-Lists with a specific text from their comments. - Click OK.
- From the Entity Profile page
- Open the required email profile, message, or file from the Security Events.
- Under Security Stack, select Create Allow-List.
- Select the required Allow-List Type.
- Sender
- Recipient
- File MD5
- String
The File MD5 or file's detected strings will be displayed automatically.
- Enter the required sender/recipient's email address or domain, or strings.
- If required, enter a comment for the Allow-List rule and click OK.
You can use the commented text to filter and find the Allow-Lists with a specific text from their comments. - Click OK.
Click-Time Exceptions
Avanan allows administrators to override Avanan detections or prevent link rewriting by defining exceptions to the inspection on replaced links. Administrators can add URLs and domains to these exceptions list:
- Allow-list - Even if Avanan finds the website malicious, Avanan allows the user to access the website. However, Avanan replaces the link, and clicking on it is logged into the system.
- Block-list - Even if Avanan finds the website benign, Avanan blocks the user from accessing it and shows it is blocked.
- Ignore-list - Avanan does not replace the links to these URLs/domains. Therefore, Avanan does not monitor clicks on these links or track them.
To configure Click-Time Protection exceptions:
- Navigate to Security Settings > Click-Time Protection Exceptions.
- Click Add New Exception.
- Under Domain, enter the required domain in the Domain pattern: domain.com format.
- Choose the required exception type under List Name.
- Block-list -Click-Time Protection engine automatically flags this URL as malicious without even scanning it.
- Allow-list -Click-Time Protection engine automatically flags this URL as clean without even scanning it.
- Ignore-list -Click-Time Protection engine will not replace this URL.
- Click OK.
Link Shorteners and Re-Directions
Click-Time Protection exceptions apply only to the URLs written in the email and its attachments.
If an email contains a shortened link or a link that automatically redirects to one of the URLs/domains in the exception lists, the link in the email will not be excluded. However, these links will be re-written and inspected, and access to them will be enforced based on the inspection result and policy, as if they were not part of any exception list.
For example, if a domain domain.com is in the block list and the email contains the shortened link bit.ly/12345 that redirects to domain.com, the link will be re-written and inspected like any other link and users clicking on the link will not be automatically blocked from accessing the website.
URL Reputation Exceptions
You can add URL Reputation exceptions (Allow-List or Block-List) from any of these:
- From the URL Reputation Exceptions page:
- Go to Security Settings > Exceptions > URL Reputation.
- In the drop-down from the top of the page, select the required exception type.
- Allow-List
- Block-List
- To add exception for a domain:
- In the exception List Type drop-down, select Domain.
- In the Domain field, enter the required domain name in the domain.com format.
- To add exception to a exact URL:
- In the exception List Type drop-down, select Exact URL.
- In the Exact URL field, enter the required URL.
Note - Only URLs identical to the typed exact URL will be allow-listed / block-listed.
- If required, enter a description for the exception under Comment, and click OK.
Notes:
Allow-listed URLs will not be flagged as malicious.
Block-listed URLs will not be flagged as clean.
- From the Microsoft Teams / Slack message profile page:
- Open the required message profile from the Security Events.
- To create an allow-list, under Security Stack, click Create Allow-List next to the malicious URL / Domain.
or
Click More Info and then click Create Allow-List next to the malicious URL / Domain. - To create a block-list, under Security Stack, click Create Block-List next to the URL / Domain.
or
Click More Info and then click Create Block-List next to the URL / Domain. - Select the exception type (Exact URL or Domain).
Avanan automatically detects and shows the URL or Domain.
Note - Only URLs identical to the typed exact URL will be allow-listed / block-listed. - If required edit the URL / Domain.
- If required, enter a description for the exception under Comment, and click OK.
Notes:
Allow-listed URLs will not be flagged as malicious.
Block-listed URLs will not be flagged as clean.
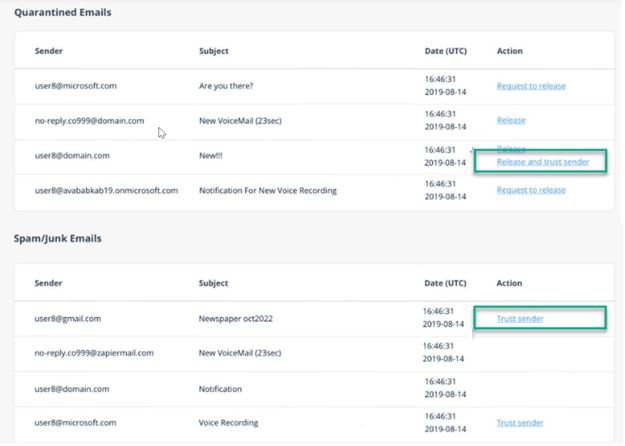
Trusted Senders - End-User Spam Allow-List
When an end user adds a sender / domain to spam allow list from the Daily Quarantine report, Avanan shows the details on the Trusted Senders (Spam Exceptions) page.
To manage the list of senders trusted by end users, click Security Settings > Exceptions > Anti-Spam.
Adding Trusted Senders
To add trusted senders manually:
- Click Trusted Sender.
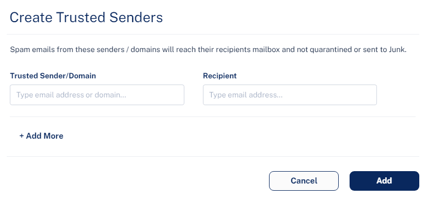
- In the Trusted Sender/Domain field, enter the sender email address or domain.
- In the Recipient field, enter the recipient email address.
- To add more senders or domains, click +Add More and repeat steps 2 to 3.
- Click Add.
To upload a CSV file with trusted senders:
Note - You can upload CSV file only upto 50 kb.
- Click Import.
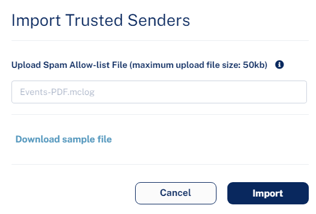
- In the Upload Spam Allow-list File field, click Choose a file and select the CSV file.
- Click Import.
To edit the trusted senders:
- Click the vertical ellipses icon from the last column of the trusted sender.
- To edit a trusted sender:
- Click Edit and make the necessary changes.
- Click Edit.
- To delete a trusted sender, click Delete.
-
To delete multiple trusted senders at a time, select the trusted senders and click Delete from the top right corner of the page.