Introduction
The Office 365 onboarding process to Avanan, during which customers bind their Office 365 environment to Avanan, can be executed either automatically or manually.
In automatic mode, you need to approve the Office 365 App in the SaaS Apps Store on your portal, and all configuration changes are applied by Avanan. Additionally, any changes made to the Office 365 policies on your portal, will be automatically reflected in the Office 365 environment.
In manual mode, no changes are applied to the Office 365 environment by Avanan, all changes need to be implemented manually. Furthermore, any change to the Office 365 policies on your portal, should be implemented manually on the Mail-Flow rules.
Note - Automatic mode for onboarding allows for better maintenance, management, and smoother user experience. Avanan recommends only using Manual mode as a last resort. Before using the Manual mode, contact Avanan Support to help resolve any issues raised with the Automatic mode for onboarding.
Note - In some configurations we refer to {portal}, this is an indication of your portal name. For example, if your portal is customer-x.avanan.net, then you will need to replace ‘{portal}’ with ‘customer-x’.
Manual Integration with Office 365 Mail - Required Permissions
You can choose the Manual mode of integration when you do not want Avanan to automatically add and manage Mail Flow rules, connectors, and other Microsoft configurations for your organization.
As these configurations are not managed by Avanan, Manual mode require less permissions when compared with Automatic mode.
| Permissions required from Office 365 for manual integration | Functions performed by Avanan |
| Access directory as the signed in user |
Used for these:
|
| Read directory data | |
| Read contacts in all mailboxes | Used for baselining social graphs and communication patterns for accurate phishing detections. |
| Enable and disable user accounts | Used for taking actions in response to security events involving user accounts. |
| Read user mailbox settings | Used for continuously monitoring mailbox settings to detect indications for account compromising, such as MFA settings, forwarding rules and many more. |
| Read all user mailbox settings | |
| Read and write mail in all mailboxes | |
| Read all audit log data |
Used for retrospective audit of login events to detect |
| Read all groups (preview) |
Used for mapping users to groups to properly assign policies to users. |
| Read and write all groups | |
| Read all directory RBAC settings | (Reserved for future release) Used to allow administrators to disable users or reset their password. |
| Read all users' full profiles |
Used for these:
|
| Read activity data for your organization |
Used for these:
|
| Read service health information for your organization |
Reserved for future releases. |
| Send mail on behalf of others | Used for sending notifications to end-users in scenarios that technically SMTP delivery is not available. This includes phishing, malware and DLP notifications. |
| Read and write user and shared mail |
Used for these:
|
| Read and write user mail | |
| Use Exchange Web Services with full access to all mailboxes | |
| send mail as a user |
Used for sending notifications to end-users in scenarios that technically SMTP delivery is not available. This includes phishing, malware and DLP notifications. |
| Send mail as any user |
Authorize the Manual Integration Application
- From the Getting Started Wizard, click Start for Office 365 Mail.
or
From the left panel, click Security Settings > SaaS Applications. - Click Start for Office 365 Mail.
- Select Manual mode of operation.
- In the Office 365 Authorization window that appears, sign in with your Microsoft Global Administrator credentials.
- In the authorization screen, click Accept to grant permissions for AVANAN Cloud Security Platform - Emails - Manual Mode application.
For more information about permissions, see Required Permissions for Manual Mode.
Content
Policy Modes
These are the supported policy modes:
- Monitor - monitors the emails and creates the relevant event.
- Detect and Prevent - creates an event, and also performs retroactive enforcement for Inbound emails already delivered to users.
- Inline - All emails are reviewed before delivery to the user.
Monitor and Detect and Prevent have the same configuration in Office 365.
Inline Mode - Integration Steps
- Connectors
- Creating connector filter
- Journal Rule
- Create Inline Outbound Connectors
- Create Inline rules
- Transport Rules - Inline Mode
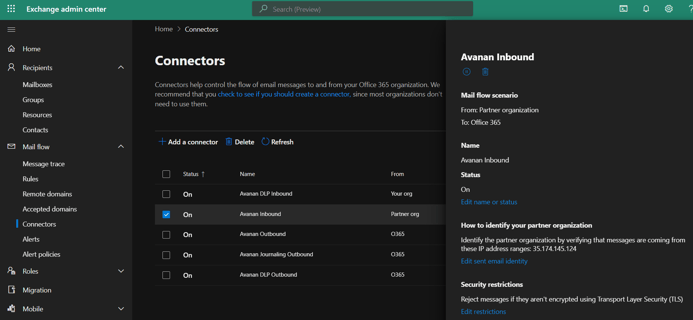
Step 1: Connectors
In this step, you define two connectors:
- Journaling Outbound - For Monitoring mode. Required in all modes.
- Inbound connector - For all modes.
These connectors send traffic to and receive traffic from the cloud. For information on the configuration for Inline see later.
Create new connectors
In the Exchange admin center, go to Mail flow > connectors.
Create the following connectors based on the following configuration.
1.1 Inbound Connector
To configure the inbound connector
- For From, select Partner organization.
- For To, select Office 365.
- Click Next.
- For Name, enter Avanan Inbound.
- For Description, enter Avanan Inbound Connector.
- For What do you want to do after the connector is saved?, select Turn it on.
- Click Next.
- For How do you want to identify the partner organization, select Use the sender's IP address.
- Click Next.
- Under Specify the sender IP address range, click the + icon.
- If your data residency is in the United States, enter this IP address: 35.174.145.124
- If your data residency is in Europe, enter this IP address: 52.212.19.177
- If your data residency is in Canada, enter this IP address: 15.222.110.90
- If your data residency is in United Arab Emirates, enter this IP address: 3.29.194.128
- Click OK and then Next.
- Under What security restrictions do you want to apply?, select Reject email messages if they are not sent over TLS.
- Click Next.
- In the Settings Confirmation window, make sure your settings are correct before you click Save.
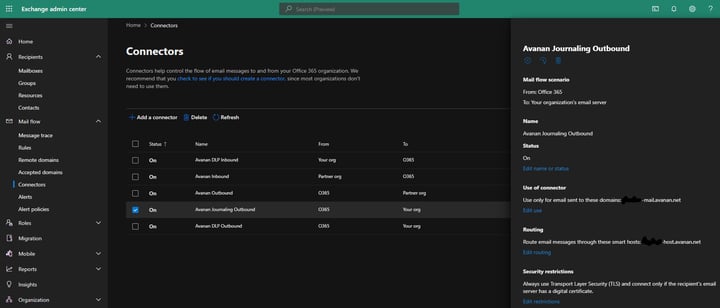
1.2 Journaling Outbound Connector
To configure the outbound connector
- For From, select Office 365.
- For To, select Your organization mail server.
- Click Next.
- For Name, enter Avanan Journaling Outbound.
- For Description (Optional), enter Avanan Journaling Outbound connector.
- For What do you want to do after connector is saved?, select Turn it on.
- Click Next.
- For When do you want to use this connector?, select Only when email messages are sent to these domains.
- Click the + icon to add a new domain: {portal}-mail.avanan.net. Replace {portal} with your portal name.
- Click OK and then Next.
- Under How do you want to route email messages?, select Route email through these smart hosts.
- Click the + icon to add a smart host, and enter the host domain name: {portal}-host.avanan.net. Replace {portal} with your portal name.
- Click Save and then Next.
- Under How should Office 365 connect to your partner organization's email server?, select Always use Transport Layer Security (TLS) to secure the connection.
- For Connect only if the recipient's email server certificate matches this criteria, select Any digital certificate, including self-signed certificates.
- Click Next.
- Check your settings before validation and click Next.
- Click the + icon and enter this email address: {portal}@{portal}-mail.avanan.net. Replace {portal} with your portal name.
- Click Validate. Make sure that both connectors were created.
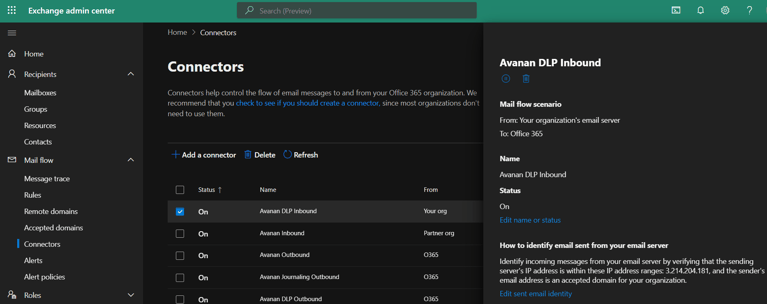
1.3 DLP inbound connector
To configure the DLP inbound connector
Similar to the Avanan Outbound connector, with the following changes:
- For from, enter Your organization mail server (step 1).
- For Name, enter Avanan DLP Inbound (step 4).
- Under Specify the sender IP address range (step 10).
- If your data residency is in the United States, enter this IP address: 3.214.204.1
- If your data residency is in Australia, enter this IP address: 13.211.69.231
- If your data residency is in Europe, enter this IP address: 52.212.19.177
- If your data residency is in United Arab Emirates, enter this IP address: 3.29.194.128
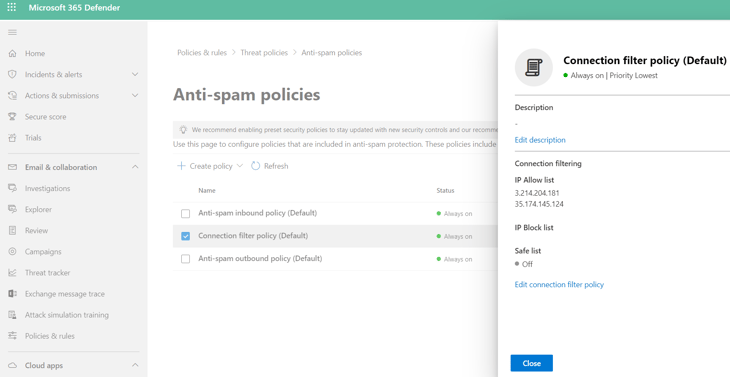
Step 2: Creating connector filter
To configure the connector filter:
- In the Exchange admin center, go to Protection > Connection filter.
- Click the icon to edit the default rule.
- Under Connection filtering > IP Allow list, click Create policy.
- Under add allowed IP address,
- If your data residency is in the United States, enter these IP address: 35.174.145.124, 3.214.204.181
- If your data residency is in Australia, enter this IP address: 13.211.69.231
- If your data residency is in Europe, enter this IP address: 52.212.19.177
- If your data residency is in United Arab Emirates, enter this IP address: 3.29.194.128
Step 3: Journal Rule
The journal rule is used for the monitoring mode. The journal rule configures Office 365 to send all emails to Avanan.
Note: Before you create a journal rule, you must specify an account to receive journal reports that cannot be delivered to the journal destination.
Please follow the steps in this guide to configure this mailbox.
The journal rule should be configured as follows:
- In the Exchange admin center, go to Compliance management > Journal rules.
- Click the + icon to create a new journal rule.
- Enter this information in the Journal Rule window:
- For Send journal reports to, enter {portal}@{portal}-mail.avanan.net. Replace {portal} with your portal name.
- For Name, enter Avanan - Monitor.
- For If the message is sent to or received from..., select (Apply to all messages).
Note - If you plan to use group filters in your setup, select the group you want to include in your policy. - For Journal the following messages..., select All messages.
- Click Save.
Step 4: Create Inline Outbound Connectors
Outbound connector
- In the Exchange admin center, go to Mail Flow > connectors.
- Click the + icon to create a new connector.
- Enter this information as the connector details:
- For From, enter Office 365.
- For To, enter Partner organization.
- Click Next.
- For Name, enter Avanan Outbound.
- For Description (Optional), enter Avanan Outbound Connector.
- For What do you want to do after connector is saved?, select Turn it on
- Click Next.
- For When do you want to use this connector?, select Only when I have a transport rule to set up that redirects messages to this connector
- Click Next.
- For How do you want to route email messages?, select Route email through these smart hosts.
- Click the + icon to add a smart host: {portal}-host.avanan.net. Replace {portal} with your portal name.
- Click Save and then Next.
- For How should Office Office 365 connect to your partner organization's email server?, select Always use Transport Layer Security (TLS) to secure the connection.
- For Connect only if the recipient's email server certificate matches this criteria, select Any digital certificate, including self-signed certificates
- Click Next.
- Confirm your settings before validation and click Next.
- Click the + icon and enter this address: {portal}@{portal}-mail.avanan.net. Replace {portal} with your portal name.
- Click Validate.
DLP Outbound connector
Similar to the Avanan Outbound connector, with the following changes:
- For To, enter Your organization mail server (step 3.b).
- For Name, enter Avanan DLP Outbound (step 3.d).
- Smart host: {portal}-dlp.avanan.net. Replace {portal} with your portal name (step 3.k).
Step 5: Create Inline rules
Create “Avanan - Protect” Inline rule
Use a similar configuration to the first mail-flow rule with the following configurations:
- For Name, enter Avanan - Protect.
- For Apply this rule if..., add two conditions:
- First condition - The sender is located outside the organization.
- Second condition - The recipient is located inside the organization.
If necessary, add another condition and specify the groups that should be inline.
- For Do the following..., add two actions:
- For Set the message header, enter this Key = X-CLOUD-SEC-AV-Info
- For to the value, enter this Value = {Portal},office365_emails,inline
- First action - Set a message header:
- Second action - Use the following connector, select Avanan Outbound connector.
- For Except if..., add the following exception:
- If your data residency is in the United States, enter this IP address: 35.174.145.124
- If your data residency is in Europe, enter this IP address: 52.212.19.177
- If your data residency is in Canada, enter this IP address: 15.222.110.90
- If your data residency is in United Arab Emirates, enter this IP address: 3.29.194.128
- Sender's IP address is in the range:
Note - If you have other inbound connectors using IP addresses, add their IP addresses to this list.
- Select the checkbox for Stop processing more rules.
- Click Save.
- Make sure that Avanan - Protect rule is configured like this:
Protecting Microsoft 365 Group Mailboxes
To protect group mailboxes, add the mailboxes to the Protect rule as a recipient or as a member of a Distribution List in the scope of the rule.
Create “Avanan - Protect Outgoing” Inline rule
Similar to the Avanan Outbound connector, with the following changes:
- For Apply this rule if..., add two conditions (step 2):
- First condition - The sender is located inside the organization.
- Second condition - The recipient is located outside the organization.
- For Do the following..., add two actions (step 3):
- For Set the message header, enter this Key = X-CLOUD-SEC-AV-Info
- For to the value, enter this Value = {Portal},office365_emails,sent,inline
- First action - Set a message header:
- Second action - Use the following connector, select Avanan DLP Outbound connector.
- For Except if..., add the following exception (step 4):
- If your data residency is in the United States, enter these IP addresses: 35.174.145.124, 3.214.204.181
- If your data residency is in Australia, enter this IP address: 13.211.69.231
- If your data residency is in Europe, enter this IP address: 52.212.19.177
- If your data residency is in United Arab Emirates, enter this IP address: 3.29.194.128
- Sender's IP address is in the range:
Step 6: Transport Rules - Inline Mode
The purpose of the transport rule is to implement the inline mode for the users that need to be inline. Every time you change the scope of the inline policy (add or remove users/groups) you need to edit the scope of the transport rule accordingly.
Junk Filter rule
To configure the Avanan Junk filter rule
- For Name, enter Avanan - Junk Filter.
- For Apply this rule if..., add two conditions:
- If your data residency is in the United States, enter this IP address: 35.174.145.124
- If your data residency is in Europe, enter this IP address: 52.212.19.177
- If your data residency is in Canada, enter this IP address: 15.222.110.90
- First condition - A message header matches these patterns, for the header enter X-CLOUD-SEC-AV-SPAM-HIGH, and for the text patterns enter true.
- Second condition - Senders IP address is in the range -
- For Do the following…, select Modify the message properties and then set the spam confidence level (SCL) to 9.
Junk Filter Low rule
To configure the Avanan Junk Filter Low rule
- For Name, enter Avanan - Junk Filter Low.
- For Apply this rule if..., add two conditions:
- If your data residency is in the United States, enter this IP address: 35.174.145.124
- If your data residency is in Europe, enter this IP address: 52.212.19.177
- If your data residency is in Canada, enter this IP address: 15.222.110.90
- If your data residency is in United Arab Emirates, enter this IP address: 3.29.194.128
- First condition - A message header matches these patterns, for the header enter X-CLOUD-SEC-AV-SPAM-LOW, and for the text patterns enter true.
- Second condition - Senders IP address is in the range -
- For Do the following…, select Modify the message properties and then set the spam confidence level (SCL) to 6.
Whitelist rule
To configure the Avanan whitelist rule
- For Name, enter Avanan - Whitelist.
- For Apply this rule if..., Sender's IP address is in the range:
- If your data residency is in the United States, enter this IP address: 35.174.145.124
- If your data residency is in Europe, enter this IP address: 52.212.19.177
- If your data residency is in Canada, enter this IP address: 15.222.110.90
- If your data residency is in United Arab Emirates, enter this IP address: 3.29.194.128
- For Do the following..., set the spam confidence level (SCL) to...Bypass spam filtering.
- For Except if..., select A message header matches these text patterns.
- For text patterns, select X-CLOUD-SEC-AV-SCL header matches true.
Sending User Reported Phishing Emails to an Internal Mailbox
To handle phishing reports effectively, Avanan requires that reports sent through the Microsoft Report Phishing / Report Message add-in are also sent to an internal mailbox. This mailbox can be an existing dedicated mailbox or a new shared mailbox that does not require a Microsoft license.
To send user reported phishing emails to an internal mailbox:
- Log in to the Microsoft Defender portal.
- Click Settings > Avanan > User reported settings.
- Scroll down to the Reported message destinations section and do these:
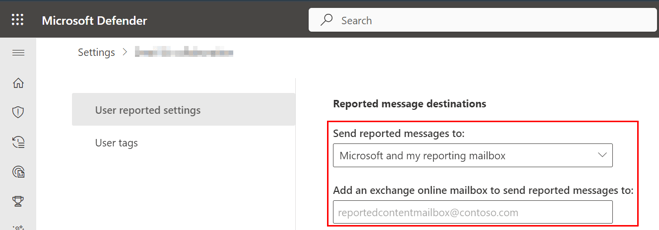
- In the Send reported messages to: field, select Microsoft and my reporting mailbox.
- In the Add an exchange online mailbox to send reported messages to: field, enter the dedicated mailbox email address.
- Click Save.
Monitoring Mode - Integration Steps
Monitoring mode requires only these steps: