Daily Quarantine Report (Digest) allows you to send a email report daily to end-users about quarantined and junk/spam emails. The end-users get detailed report that has information about the emails sent to them and quarantined in the last 24 hours.
Global and targeted attacks can generate multiple phishing emails per day, and each one results in a quarantine notification email from Avanan based on the policy defined by the administrator. When the administrator activates the Daily Quarantine Report (Digest), the user receives a single, aggregated email report per day for the quarantined emails.
The report includes:
- Quarantined emails - Emails quarantined by Avanan based on the policy workflow. Each quarantined email has an associated user action:
- Request to release – Sends a notification to the Admin to release the email. After the Admin approves, the email is delivered to the Inbox.
- Release – Delivers the email to the Inbox immediately.
- Junk emails (Optional) - Emails that were identified as junk/spam by the SmartPhish security engine, Office 365 (Spam Confidence Level (SCL) >= 5) or Google. By default, these emails are sent to the Junk folder. Users can find any misclassified emails and move them to their inboxes, if required.
- Link to generate quarantine report on demand (Optional) - Adds a link at the bottom of the Daily Quarantine Report (Digest) email. The end users can click this link to generate a new quarantine report for the last 24 hours.
Notes:
- The report does not include quarantined emails that do not allow user action.
-
If no events happened in the last 24 hours, the user will not receive the daily quarantine digest email.
Configuring Daily Quarantine Report (Digest)
- Log in to the Avanan portal.
- Click Security Settings > User Interaction > Restore Requests.
- Scroll down to the End User Quarantine Report section.
- Enable End User Quarantine Report.
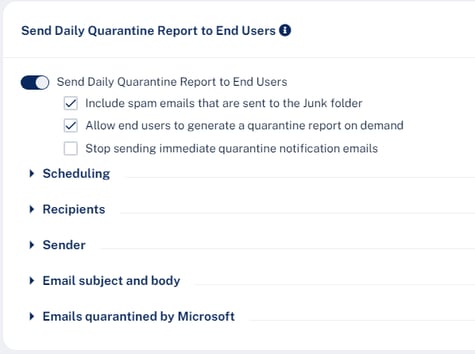
- To include spam emails sent to the Junk folder in the report, select Include spam emails that are sent to the Junk folder checkbox.
- To allow end users to generate a new quarantine report for the last 24 hours, select the Allow end users to generate a quarantine report on demand checkbox.
This option adds a link at the bottom of the Daily Quarantine Report (Digest) email. The end users can click this link to generate a new quarantine report for the last 24 hours. - If some of the selected recipients have a Threat Detection policy configured to alert on every detected phishing email, you can disable those alerts by enabling the Do not send immediate quarantine notification email checkbox.
- Under Scheduling, select the time and time zone to send the report.
- Under Daily at, select a specific hour of the day to send the report.
To send the report multiple times in a day, click + Add More and select the required time.
You can select to send the report every hour (up to 24 times) of the day. - Select the required Time zone.
- Under Daily at, select a specific hour of the day to send the report.
- Under Recipients, select the users to send the quarantine report.
- To send the report to all users, select All Users.
- To send the report to specific users, select Select Users or Groups and do these steps.
- In the Specific Users and Groups list, select the users or groups.
- Click Add to Selected.
The selected users and groups are displayed in the Selected list.
- Under Sender, customize the sender details for the daily quarantine digest.
- Under Friendly-from name, customize the display name next to the email address from which the report must be sent.
- By default, None is selected and the report is sent with no Friendly-from name.
Note - Some email clients duplicate the sending address to the Friendly-from name. - To send the report from a different name, select Custom and enter the required name.
- By default, None is selected and the report is sent with no Friendly-from name.
- Under From Address, select the email address from which the report must be sent.
- To send the report from no-reply@[recipient domain], select Default.
For example, user@company.com receives the quarantine report from noreply@company.com - To send the report from a different email address, select Custom and enter the required
email address.
Note - If you use the default sender or any email address under your domain, to prevent SPF and DMARC fail, you must add include:spfa.cpmails.com to your SPF record.
- To send the report from no-reply@[recipient domain], select Default.
- Under Reply-to address, select the email address to which email replies to the report will be sent.
- To reply to the same email address from which the report was sent, select Same as From address.
- To reply to a different email address, select Custom and enter the required email address.
Note - If you use the default sender or any email address under your domain, to prevent SPF and DMARC fail, you must add include:spfa.cpmails.com to your SPF record.
- Under Friendly-from name, customize the display name next to the email address from which the report must be sent.
- Under Email subject and body, customize the subject and the body of the daily quarantine report email.
- Under Subject, you can customize the subject of the daily quarantine report email.
- Under Body, you can customize the body (text, table titles, and column titles) of the daily quarantine report email.
To add links to the email footer:- Place the cursor where you want to add the link.
- Click the
 icon.
icon.
or
Right-click and select Link. - In the URL field, enter the URL.
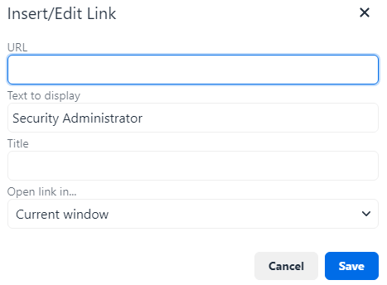
- In the Text to display field, enter the text that should appear for the link.
- If required, enter a Title for the link.
- In the Open link in list, select Current window or New window.
- Click Save.
- Place the cursor where you want to add the link.
- Under Emails quarantined by Microsoft, select the actions the user can perform for the Microsoft quarantined items in the daily quarantine report.
You can select actions for malware, high confidence phishing, phishing, spam, high confidence spam, and bulk categories of emails.
Supported actions:
- Can restore on their own
- Cannot restore
- Can request a restore (admin needs to approve)
- Click Save and Apply.
Prerequisites to Avoid Failing SPF Checks
For Office 365 Mail, if you enable Protect (Inline) Outgoing Traffic in the DLP or Threat Detection policy, Avanan gets added to the email delivery chain before reaching external recipients (Internal email sender > Microsoft 365 > Avanan > Microsoft 365 > External recipient).
The recipient's email security solution sees the Avanan IP address as part of the delivery chain. If the recipient's email security solution fails to recognize the original IP address, it may consider the Avanan IP address as the IP address from which the email was sent.
If you do not configure the SPF record in your DNS to allow Avanan IP addresses to send emails on behalf of your domain, your emails might fail SPF checks and may be rejected. Avanan recommends you add the Avanan IP addresses to your SPF record before you enable Protect (Inline) Outgoing Traffic for outgoing emails.
To prevent outgoing emails from failing SPF checks and being quarantined, you must add include:spfa.cpmails.com to your SPF record.
Note - The above statement includes several IP addresses and networks, some outside your Avanan portal's data region. This is done for uniformity and consistency in all Avanan SPF records regardless of your data region. Avanan sends the emails only from one of the IP addresses in your region.