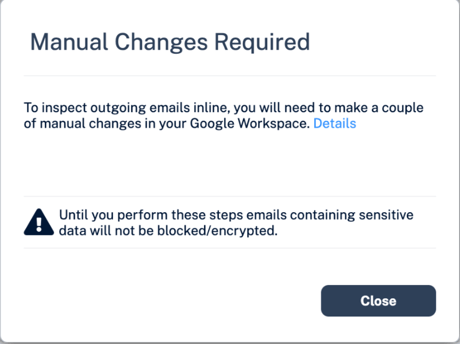
If you receive the Manual Changes Required message while creating a Prevent (Inline) DLP policy for Gmail, you must make these changes in the Google Admin Console.
Step 1: Adding a Host
- Sign in to the Google Admin Console.
- From the left navigation panel, click Apps > Google Workspace > Gmail.
- Click Hosts.
- Click Add Route.
- Under Name, enter CLOUD-SEC-AV DLP Service for the mail route.
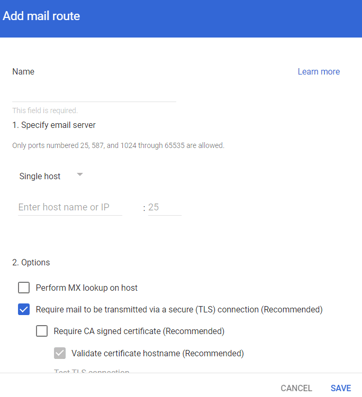
- Under Specify email server, select Single host.
- Enter the host name as [portal]-dlp.avanan.net
To find the portal identifier, see Portal identifier of Avanan portal. - Enter the port number as 25.
- Under Options, clear the Require CA signed certificate checkbox.
- Click Save.
Step 2: Updating Inbound Gateway
- From the left navigation panel, click Apps > Google Workspace > Gmail.
- Scroll-down and click Spam, Phishing and Malware.
- Click Inbound gateway.
-
Select Enable and under Gateway IPs, click Add and enter the IP address or IP address range relevant to your Avanan Portal tenant (account) region.
For the list of supported IP addresses, see IP Addresses Supported Per Region.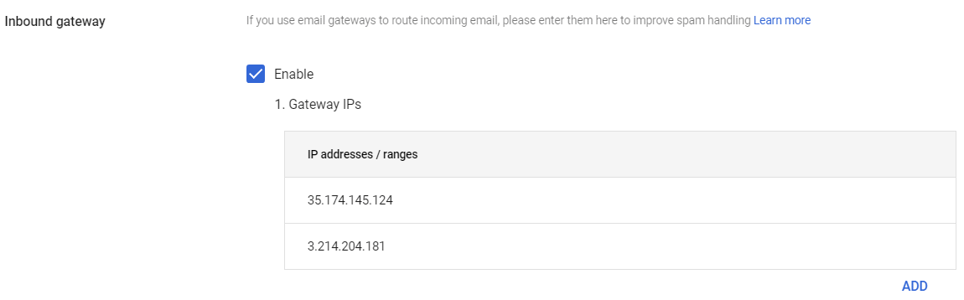
- Click Save.
Step 3: Adding SMTP Relay Host
- From the left navigation panel, click Apps > Google Workspace > Gmail.
- Scroll down and click Routing.
- Click SMTP relay service.
- Click Add Another Rule.
- Enter a description of the rule.
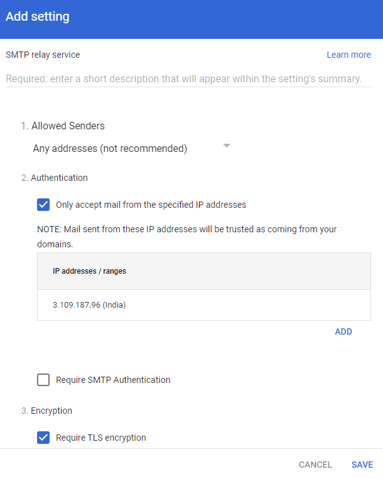
- In the Allow Senders list, select Any Addresses checkbox.
- Under Authentication, do options:
- Select the Only accept mail from the specified IP addresses checkbox.
-
Add the IP addresses relevant to your Avanan Portal tenant (account) region.
For the list of supported IP addresses, see IP Addresses Supported Per Region.
To add an IP address:- Click Add.
- Enter a Description for the IP address.
- Enter the IP address.
- Select the Enable checkbox.
- Click Save.
-
Clear the Require SMTP Authentication checkbox.
-
Under Encryption, select the Require TLS encryption checkbox.
-
Click Save.
Step 4: Add Groups
You must create two groups.
- avanan_inline_outgoing_policy
- avanan_monitor_outgoing_policy
Note - If you use GCDS (Google Cloud Directory Sync) to synchronize your user groups on-premises and in the cloud, the synchronization triggers the deletion of these Avanan groups. Though this will not impact the email delivery, Avanan cannot scan the emails, and no security events are generated.
Before activating Google Workspace, you must create exclusion rules for these user groups. Select the exclusion type as Group Email Address, match type as Exact Match, and the group email address should be in the groupname@[domain] format.
For example, the group email addresses should be avanan_inline_outgoing_policy@mycompany.com and avanan_monitor_outgoing_policy@mycompany.com, where mycompany is the name of your company.
To create a group:
- From the left navigation panel, click Directory > Groups.
- Click Create Group.
- In the Group name field, enter the group name. For example, avanan_inline_outgoing_policy.
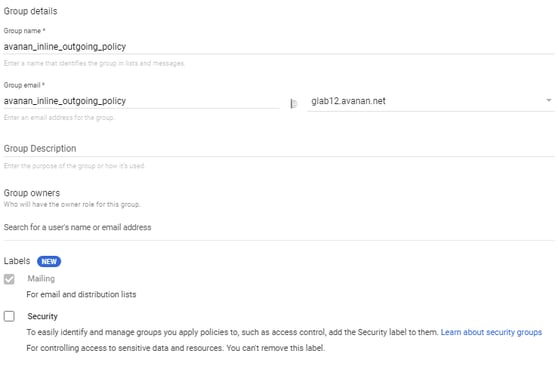
- In Group email field, enter the group email. For example, avanan_inline_outgoing_policy.
- Click Next.
-
In Access Settings, clear everything except the default settings.
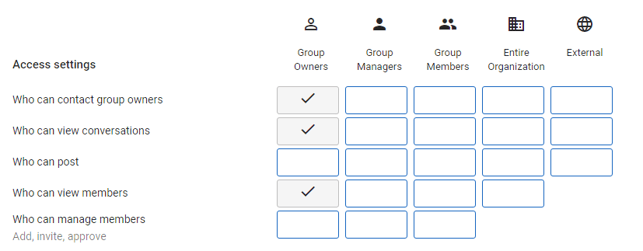
- In Who can join the group, select Anyone in the organization can join.
- Click Create Group.
-
Repeat the same procedure and create a group with the Group name and Group email as avanan_monitor_outgoing_policy.
After creating the groups, you must do these to the avanan_monitor_outgoing_policy group.
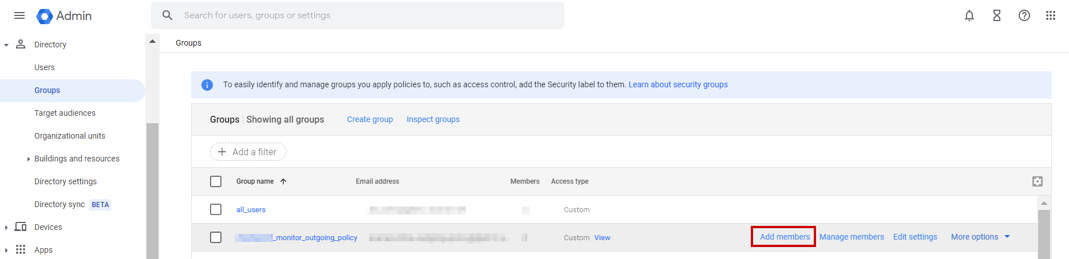
- From the left navigation panel, click Directory > Groups.
- Hover over the avanan_monitor_outgoing_policy group you created and click Add members.
-
Click Advanced and select the Add all current and future users of {domain} to this group with All Email setting checkbox.
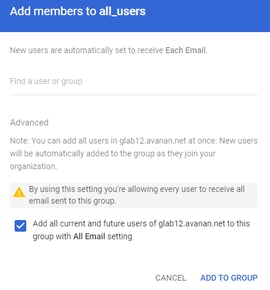
-
Click Add to Group.
Step 5: Create a Compliance Rule
- From the left navigation panel, click Apps > Google Workspace > Gmail.
-
Scroll-down and click Compliance.
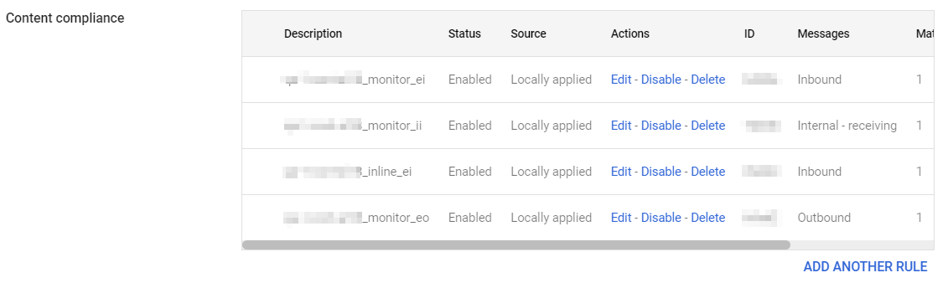
By default, the system shows these rules for Content compliance:-
[portal identifier]_monitor_ei
-
[portal identifier]_monitor_ii
-
[portal identifier]_monitor_eo
-
[portal identifier]_inline_ei
To find the portal identifier, see Portal identifier of Avanan portal.
-
-
Update the settings for [portal]_monitor_eo rule.
-
For [portal]_monitor_eo rule, click Edit.
-
Scroll down to the end of the Edit setting pop-up and click Show options.
-
Under Envelope filter, select the Only affect specific envelope senders checkbox.
-
From the list, select Group membership (only sent mail).
-
Click Select groups and select avanan_monitor_outgoing_policy.
-
Click Save.
-
-
Create the [portal identifier]_inline_eo rule with these settings:
-
From the Content compliance rules, click Add Another Rule.

-
Enter the Content compliance rule name as [portal identifier]_inline_eo.
-
Under Email messages to affect, do these:
-
Select the Outbound checkbox.
-
In Add expressions that describe the content you want to search for in each message, select If ALL of the following match the message.
-
Click Add.
-
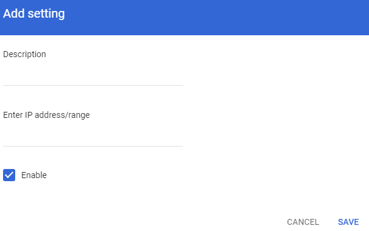
In the Add setting pop-up, select Metadata match.
-
Under Attribute, select Source IP.
-
Under Match type, select Source IP is not within the following range.
-
Enter the IP address relevant to your data region.
For the list of supported IP addresses, see IP Addresses Supported Per Region. -
Click Save.
-
-
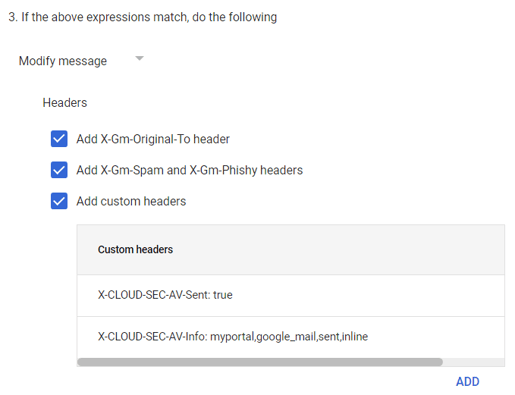
Under If the above expressions match, do the following, do these:
-
Select Modify message.
-
Under Headers, do these:
-
Select Add X-Gm-Original-To header checkbox.
-
Select Add X-Gm-Spam and X-Gm-Phishy headers checkbox.
-
Select Add custom headers checkbox and add custom headers with these values.
Header Key
Header Value
CLOUD-SEC-AV-Sent
true
CLOUD-SEC-AV-Info
[portal],google_mail,sent,inline
To add a custom header:
-
Click Add.
-
In Header key, enter the header key.
-
In Header value, enter the header value.
-
Click Save.
-
-
-
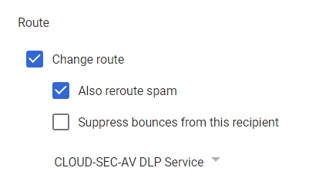
Under Route, do these:
-
Select the Change route checkbox.
-
Select the Also reroute spam checkbox.
-
In the list, select CLOUD-SEC-AV DLP Service.
-
-
-
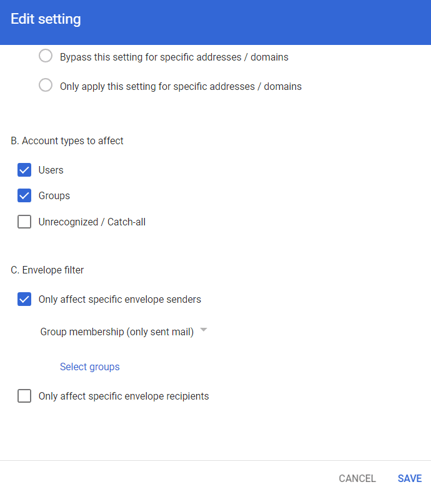
Scroll down to the end of the page and click Show options.
-
Under Account types to affect, select Users and Groups checkbox.
-
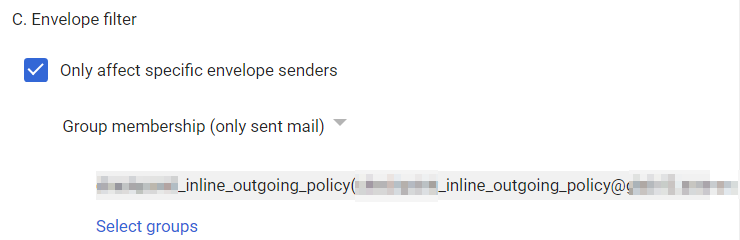
Under Envelope filter, do these:
-
Select the Only affect specific envelope senders checkbox.
-
From the list, select Group membership (only sent mail).
-
Click Select groups and select avanan_inline_outgoing_policy.
-
Click Save.
-
-
IP Addresses Supported Per Region
United States
-
35.174.145.124
-
3.214.204.181
-
44.211.178.96/28
-
44.211.178.112/28
-
3.101.216.128/28
-
3.101.216.144/28
Australia *
-
13.211.69.231
-
3.105.224.60
-
3.27.51.160/28
-
3.27.51.176/28
-
18.143.136.64/28
-
18.143.136.80/28
Canada
-
15.222.110.90
-
52.60.189.48
-
3.99.253.64/28
-
3.99.253.80/28
-
3.101.216.128/28
-
3.101.216.144/28
Europe
-
52.212.19.177
-
52.17.62.50
-
3.252.108.160/28
-
3.252.108.176/28
-
13.39.103.0/28
-
13.39.103.23/28
India *
-
3.109.187.96
-
43.204.62.184
-
43.205.150.240/29
-
43.205.150.248/29
-
18.143.136.64/28
-
18.143.136.80/28
* These regions are relevant only for tenants created using the Avanan MSP Portal.