Security Engines - Anti-Malware

The Anti-Malware engine determines if an email attachment or a shared file contains malware. It detects files containing known malware (Anti-Virus) and Avanan’s advanced sandbox (Threat Emulation) to detect the evasive zero-day malware.

Engines Enabled

Under Engines Enabled, you can see the security engines available based on the license.

It could include Anti-Virus (known malware detection) or Threat Emulation & Antivirus (advanced sandbox).

To see the Engines Enabled for your tenant, navigate to Configuration > Security Engines and click Configure for Anti-Malware.

Malware Emulation Operating Systems

Sandboxing attachments and shared files is crucial for detecting advanced zero-day unknown malware hidden in them.

By default, Check Point runs the virtual machines with the recommended operating systems, which provide the highest detection rates, to emulate and inspect the files.

Note - A dedicated team in Check Point continuously monitors and optimizes the detection efficacy of the sandbox and selects the optimal operating systems to be used in the virtual machines of the sandbox.
Based on their decisions, the recommended operating systems may change and the change will take effect in Avanan automatically.

To override the Check Point recommended operating systems:

  1. Go to Configuration > Security Engines.
  2. Click Configure for Anti-Malware.
  3. Under Emulation Operating Systems, select the required options.
    • To override the recommended operating systems, select the Override Check Point defaults (select up to 3) checkbox.
    • Select the required operating systems.

      Note - You can select only up to three operating systems.

  4. Click Save.

Anti-Malware Exceptions

Anti-Malware Allow-List

Administrators can exclude files from malware inspection so that the Anti-Malware engine always returns a clean verdict for them.

You can use File MD5 hash or a Macro MD5 hash in an Anti-Malware Allow-List rule. You can use Macro MD5 as an exception and prevent the Anti-Malware engine from detecting the file that contains a macro as malware.

Note - Macro MD5 Allow-List supports these file formats: DOC, DOCM, DOCX, DOTM, DOTX, POT, POTM, POTX, PPA, PPAM, PPS, PPSM, PPSX, PPT, PPTM, PPTX, XLAM, XLSB, XLSM, XLSX, XLTM, and XLTX.

You can add Anti-Malware Allow-List rule from any of these:

  • From the Anti-Malware Allow-List
    1. Navigate to Configuration > Anti-Malware Allow-List.
    2. Click Create Allow-List.
    3. Enter the required File MD5 hash.
    4. If required, enter a comment for the Allow-List rule.
      Administrators can use the commented text to filter and find the Allow-Lists with a specific text from their comments.
    5. Click OK.
  • From the Entity Profile page
    1. Open the required attachment profile from the Security Events.
    2. Under Security Stack, select Create Allow-List for Anti-Malware.
    3. Select the Allow-List Type (File MD5 or Macro MD5).
      The File MD5 or the file's detected Macro MD5 will be displayed automatically.
      Notes:
      Administrators can see the code of each Macro MD5 by selecting a specific Macro MD5.
      You can add only one Macro in an Allow-List rule and the files containing the allow-listed macro will not be flagged as malicious.
    4. If required, enter a comment for the Allow-List rule.
      Administrators can use the commented text to filter and find the Allow-Lists with a specific text from their comments.
    5. Click OK.

Anti-Malware Block-List

Administrators can create Anti-Malware Block-List to mark any file type as malware. By adding a Block-List rule for a file type, the Anti-Malware engine automatically marks all matching file types as containing malware.

Note - For file types (PDF, EML, HTML) that support link identification, you can choose to block these files based on whether they contain links or not.

You can add Anti-Malware Block-List rule from any of these:

  • From the Anti-Malware Block-List
    1. Navigate to Configuration > Anti-Malware Block-List.
    2. Click Create Block-List.
    3. Enter the required File Type.
      Note - When you add multiple file types, each file type will be added as a separate exception.
    4. For the file types that support link identification (PDF, EML, and HTML), select one of these.
      • Block always (with or without links)
      • Block only if contains links
      • Block only if does not contain links
      Note - This option is available only for PDF, EML, and HTML file types.
    5. If required, enter a comment for the Block-List rule.
      Administrators can use the commented text to filter and find the Block-Lists with a specific text from their comments.
    6. Click OK.
  • From the Entity Profile page
    1. Open the required attachment profile from the Security Events.
    2. Under Security Stack, click Create Block-List for Anti-Malware.
      The detected file type displays automatically.
    3. If required, add the required file types.
      Note - When you add multiple file types, each file type will be added as a separate exception.
    4. For the file types that support link identification (PDF, EML, and HTML), select one of these.
      • Block always (with or without links)
      • Block only if contains links
      • Block only if does not contain links
      Note - This option is available only for PDF, EML, and HTML file types.
    5. If required, enter a comment for the Block-List rule.
      Administrators can use the commented text to filter and find the Block-Lists with a specific text from their comments.
    6. Click OK.
Reviewing Malware Events

The Anti-Malware engine is responsible for detecting malicious files.  It comprises of matching the file against a database of known malicious files (Anti-Virus) and running it through an advanced sandbox (Threat Emulation).

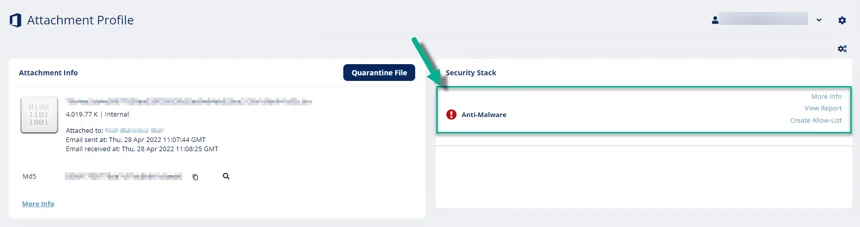
To review the event details, open the attachment profile page for the malicious event. In the Anti-Malware section under Security Stack, you can do these.

  • To view the sandbox report with a detailed explanation about why the file was deemed malicious, click View Report.
    • To download the malicious file from the report to your local computer, click Actions > Download File.
      Download-Threat-Details-Report
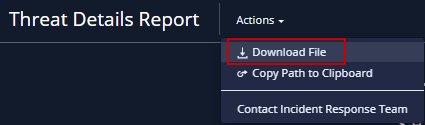
      Warning - You should use the downloaded file with care as the malware can cause significant damage to computers, networks, and corporate data.
      • To help you not run the malicious file accidentally on your local computer, the malicious file gets downloaded in the compressed tar.gz format as a password-protected file.
      • Use infected_te_report as the password to extract the malicious file.
  • To view the confidence level of the detection by the sandbox or the signature used by the static engines used to detect the malware, click More Info.
    anti-malware

Acting on Malware Events

  • To quarantine an email, click Quarantine Email from the email profile.
  • To release an email from quarantine, click Restore Email if the email is already in quarantine.
  • To exclude a file that you believe was falsely detected as containing malware, add the file to Allow-List.

For more details about adding Anti-Malware Allow-List rule, see Anti-Malware Allow-List.