MSP Portal Settings allows to administer the portal configuration.
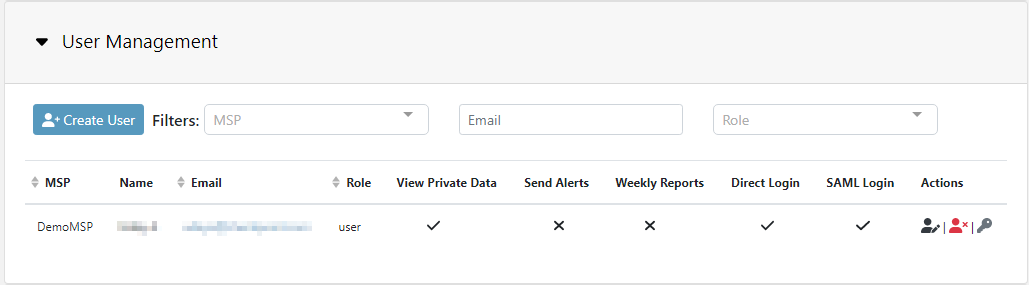
User Management
User management allows MSPs to control their MSP Portal users. It is possible to add, remove and edit users according to needs. Top-Level MSPs can also manage Child MSP users.
All users are portal administrators and gain access to the managed tenants. Each user can be configured to log in with a password or with SAML (if available).
MSP Portal User Roles
MSP portal users can be assigned a role in the MSP Portal to view and control the customer portals they have access to.
There are two MSP Portal roles:
- MSP Admin - Can access all the customer portals and have full access to the MSP portal settings and reporting.
- MSP Help Desk - Can access only a set of customer portals and are not allowed to change the MSP portal settings.
Permissions for the different MSP Portal roles:
| Feature | MSP Admin | MSP Help Desk | |
| Managing MSP Portal | User Management | Can view and edit | Cannot view |
| Branding | Can view and edit | Cannot view | |
| Authentication Settings | Can view and edit | Cannot view | |
| Other Settings | Can view and edit | Cannot view | |
| Tenant Information | Security Settings | Can view for all the tenants | Can view only for the assigned tenants |
| Usage Report | Can view for all the tenants | Cannot view | |
| MSP Portal Notifications (if enabled) | Can receive for all the tenants | Can receive only for the assigned tenants | |
| Tenant Actions | Child MSP Actions | Can do | Cannot do |
| Create Child MSP | Can do | Cannot do | |
| Delete Tenant | Can do | Cannot do | |
| License Tenant | Can do | Cannot do | |
| Audit | View Audit Logs | Can view | Cannot view |
Assigning Customer Tenants to MSP Help Desk Users
To assign the customer tenants to a Help Desk user:
- Log in to the Avanan MSP Portal.
- Go to Settings > User Management.
- Click Edit for the user you need to assign customer tenants.
- Expand MSP Portal Settings.
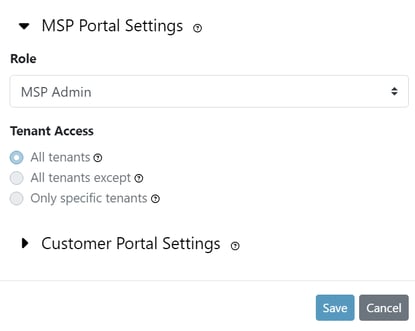
- In Role, select MSP Help Desk.
- In Tenant Access, select the tenants the user can access.
- To allow access to all the tenants except some tenants, select All tenants except and then select the tenants that need to be excluded.
- To allow access only to some tenants, select Only specific tenants and then select the tenants you need to include.
- Click Save.
Creating a New User
To create a new user:
- Go to Settings.
- Expand User Management and click Create User.
- In the Create User pop-up that appears, specify the following attributes:
- User First Name and Last Name.
- User Email to login with.
- Role - the role associated with the user in the managed tenants.
- Advanced options:
- Drill down to user data - allow admin to view emails content (on tenant portal). Viewing email content is audited.
- Authentication method - Password Login or SAML Login.
- Receive Reports - admin will receive weekly admin reports from each tenant.
- Send alerts - allow admin to resend alerts to users.
- MSP - Associate user with Child MSP (available for Top-Level MSP only).
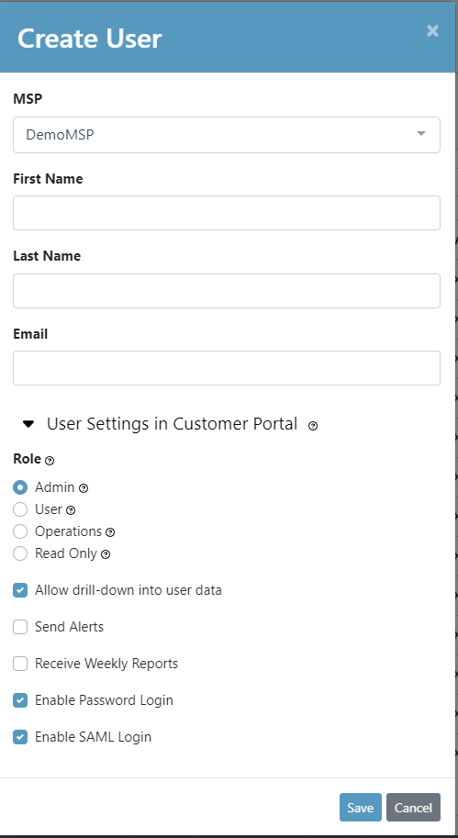
- Click Save.
Editing a User
- To edit a user, click on the Edit button
 from the Actions column.
 - In the Edit User pop-up that appears, make the required changes.
For more information on the available fields, see Creating a New User. - Click Save.
Delete a User
To delete a user, click on the Delete button ![]() from the Actions column.
from the Actions column.
Reset Password
To reset a password, click on the Password Reset button ![]() from the Actions column.
from the Actions column.
Notifications
Avanan MSP portal allows sending email notifications when there are updates to the tenant license and managed organization updates.
To update notifications:
- Go to Settings.
- Expand Notifications and click Create User.
- In the Create User pop-up that appears, toggle the required notifications.
- Send notifications to all admins when a tenant licensed is created or updated by your organization
- Send notifications to all admins when a managed organization updates or creates a tenant license
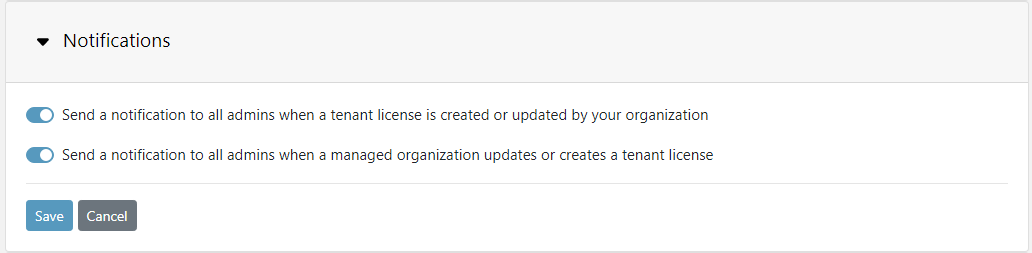
- Click Save.